This post may contain affiliate links. Please read our privacy policy.
Cheesecake. I love cheesecake. It is truly one of those desserts that I simply cannot resist. I’m guessing it’s the combination of the crisp, slightly salty graham crust paired with the sweet creamy texture of the cream cheese filling. Regardless of the reason, cheesecake equals bliss in my book.
Although we will pretty much nosh on any cheesecake that we come upon, we are extremely partial to the creamy and fluffy variety. You know, the kind that just sort of melts in your mouth and brings a big smile to your face. If you’re a fan of cheesecake, definitely keep reading because this is hands down the best cheesecake I have ever made. Period.
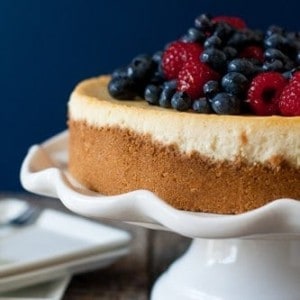
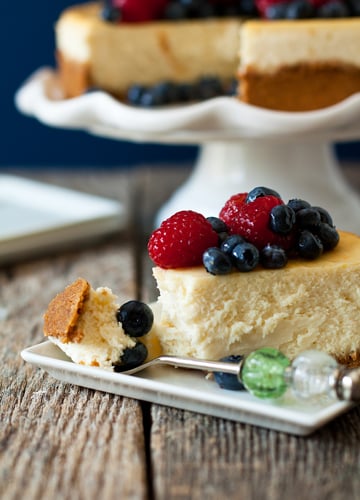
My whole family loves cheesecake (except my dad), so when I decided to go home for a visit last Sunday, I decided to bring along a cheesecake. The question was, what kind of cheesecake? I pondered on this question for a couple of hours and finally decided to keep it simple. I had an ample supply of ripe, juicy blueberries and raspberries in the fridge, so I knew they would play a role, just not sure in what capacity. I ended up establishing my game plan at the last minute; lemon scented cheesecake with a glossy berry topping. Simple, delicious and perfect for summer.
This cheesecake was a big hit; it was extremely creamy with a fresh, crisp flavor from the lemon zest and fresh berries. Brian ate himself sick after consuming two large pieces. My mom’s boyfriend, Johnny-O, loved this cake so much she caught him scarfing it from the storage container while standing over the kitchen sink and refused to give her a bite. Personally, I’m all for sharing and spreading the love EXCEPT when it comes to cheesecake, so I totally get the selfish mentality over this dessert!
If you have read any of my previous cheesecake posts, you may remember that I am pretty vocal about my disdain for cracks. Even though you can cover them up, they still irritate me beyond words. I will tell you this cheesecake recipe has never ever cracked using my extremely scientifically proven techniques. Okay, so maybe I am exaggerating about the scientific part, but here is what works for me:
1. Make sure you use a good quality springform pan.
2. Use a water bath!
3. Wrap the bottom half of the pan tightly in heavy duty foil before baking (this helps prevent the water from leaking into the pan).
4. If you are slightly OCD like me, place the foiled pan into an oven bag for extra security.
5. Allow the baked cheesecake to cool in the oven and then on the counter before placing in the refrigerator (directions will explain this).
6. Have a back-up plan if your cake cracks…fruit acts as an excellent crack concealor or you can just embrace the cracks!
Lemon Cheesecake with Fresh Berries
Ingredients
For the crust
- 2 cups graham cracker crumbs
- ½ cup unsalted butter melted
- 3 tablespoons granulated sugar
- ½ teaspoon fine sea salt
For the filling
- 32 ounces cream cheese 4 packages, room temperature
- 1 ¼ cup granulated sugar
- 4 large eggs room temperature
- ¾ cup heavy cream
- Zest of two lemons
- 1 tablespoon pure vanilla extract
- 2 cups fresh berries
Instructions
- Preheat oven to 350°F. Tightly wrap a 9-inch springform pan in heavy duty foil. This step prevents leaks when using a water bath. I also take the extra step by placing the foil wrapped spring form pan inside an oven bag while baking.
- Mix together the crust ingredients and press into the bottom of your pan and about 1 inch up the sides. Bake for 7 minutes and cool completely on a wire rack.
- Begin to boil a large pot of water for the water bath.
- In the bowl of your stand mixer fitted with your paddle attachment, combine the sugar and lemon zest and mix until the sugar is moistened and fragrant. Add in the cream cheese and cream together until smooth. Add eggs, one at a time, fully incorporating each before adding the next. Make sure to scrape down the bowl in between each egg. Add heavy cream and vanilla and mix until smooth.
- Pour batter into prepared crust. Place pan into a larger pan and pour boiling water into the larger pan until halfway up the side of the cheesecake pan.
- Bake 45 to 55 minutes, the edges will appear to be set, but the center will still have some jiggle to it. At this point, close the oven door, turn the heat off, and let rest in the cooling oven for 1 hour. After 1 hour has passed, carefully remove the cheesecake from the water bath and place on a cooling rack to cool completely. Once the cake is completely cooled, place it into the refrigerator for at least 5 hours. Top with fresh berries and serve.
Notes
- For glossy berries, simply add 1 tablespoon of hot water to 1/4 cup apricot preserves. Blend until combined and thinned out. Place the berries in a bowl and gently brush and toss the berries with the apricot and water mixture.
- If you are not a fan of lemon, simply omit the zest.
Nutrition
Nutrition information is automatically calculated, so should only be used as an approximation.


wow wow wow. i hope someday i can bake as good as you do :( meanwhile, i’m passing forward the versatile blogger award to you. your blog, recipes, and photos are simply inspiring. keep it up, especially for newbie-foodies like me!
Perfect timing because I just posted a (crackless!) cheesecake recipe as well. you should check it out! i love how simple and clean yours is…the way a good cheesecake should be.
This looks absolutely perfect Jaime. There is nothing like the feel of a good luscious cheesecake on the tongue. If you are ever in NYC you must come to Brooklyn and try Junior’s Cheesecake . It is the absolute best.
oh my! That cheesecake looks so good. I love cheesecake too, and this is just so right!
That is one gorgeous cheesecake!
Beautiful photos and what an incredibly gorgeous cheesecake! Love all the tips to prevent cracking too. I’ve never seen or used an oven bag so I can’t imagine how that works..
This looks amazing. I totally agree with the fruits being a good way to hide the cracks – I always do that! Love how you made the crust go halfway up the tin, it makes the cake look really nice! :)
Okay I’m kind of slow on this one. You take the bottom of the spring form pan wrap it in foil and then put that in the oven bag? Or do you put the whole cheesecake in the oven bag not just the bottom?
Melissa-
You’re not slow! Wrap the entire (outside) bottom half of the cheesecake pan with foil then I place the pan into an oven bag before placing it in the pan. The foil and bag act as a barrier from the water. Does this make sense? I need to do a video tutorial of this because I think I just confused myself! ;)
-Jamie
Thank you for explaining! I think I understand now. I always try my hardest to keep the water from seeping into the cheesecake so this is definitely a good idea. Can’t wait to try this method. Although a video tutorial would be nice- no complaints from me on seeing that!
Okay, I am STILL slow. Are you saying the cheesecake is baked IN the oven bag? Is it tied up? Vented? Not tied? So the cheesecake itself is covered by the bag? LOL! I always need video tutorials. Hope someone lets me know soon because I want to make this TODAY…son is coming home tomorrow after being gone 4 weeks. YUM!
GORGEOUS! We want a slice right now!! Lemon scented with berries?! Yes please…!
I love a cheesecake like this; it seems too often there is a tendency to want to add so much stuff to a cheesecake that it no longer has that amazing flavor; the very reason for loving it.
One tip I might suggest if your cheesecake does crack; I make a mix of 1.5 cups sour cream, 1/2 cup sugar and 1 tsp vanilla and put it on top of the cake for the last five minutes of baking. Not only tastes great but will hide any imperfections that might appear!